|
|
|
|
Chapter 2: Basic Editing by Tom Smallwood Objective The objective of this chapter is to teach you how to move around in the editor and add rooms to your level. You will also do some texture work. It assumes that you have gone through chapter 1.
Moving around in the editor Now that you have created a basic level, it is time to learn how to control the editor. Start with a new level (File, New Level). Select the Cylinder from the Tool Pallet, then load a texture set in the Object/Texture browser and select a texture. Any texture will do. Look at the top left editing view Window (the editing view windows are the windows that look like sheets of graph paper). By default, this window is set to the top view. In it, you should a red octagon. Now, we are going to practice moving the level around. Move the cursor over the window. Holding down the left mouse button, drag the mouse. You will notice the whole window moving around as you move the mouse. Move it up and down and right and left. Now try the right mouse button. It does the exact same thing. To zoom in and out, hold down both the right and left mouse buttons, then move the mouse forwards and backwards. These functions work in all 3 editing windows. The 3D Preview Window works a little differently. Try moving the mouse around while holding different buttons in the 3D window. Get comfortable moving the views around. The left button rotates the view when you move the mouse right and left and moves forward and backward as you move the mouse forward and back. The right button also rotates you right and left, but instead of moving forward and back, it looks up and down. If you hold both mouse buttons down, you will move sideways and vertically. Get comfortable with these movement techniques in all four windows.
Changing Brushes When you created the room in chapter 1, you selected a shape off of the tool pallet and it appeared in the preview screens in red. This red shape is called the brush. All the architecture you do for The Wheel of Time will be done with the brush. There are several shapes that you can make for your brush by clicking on the different icons on the Tool Pallet. Try clicking on the different shape tools and see how they look in the preview windows. The icons that are brush shapes are shown here:
Notice that there are some advanced shapes like the stairs and the flat plane. They will come in very handy later. Go ahead and make a room with the Cylinder brush by selecting the it and then pressing the subtraction button.
To make a second room, you will need to move the red brush and will probably want to change its size. Did you notice that when we created a cylindrical room it looked more like an octagon? This is because the game engine can not do curved surfaces. Every surface must be flat. It is possible to get a good representation of a circle by using flat surfaces. The more sides you put on the cylinder, the more realistic the curve appears. You can add surfaces to the cylinder easily, but keep in mind that the more surfaces you use, the slower the level will run. Moving the Brush Lets start by moving the brush. Right now, we will just be experimenting, so don't worry if you mess anything up. To move a brush, first select it. Simply click on it in the preview window (on the red line so that it appears bright). If you want to deselect it, just click in the gray and the brush will dim. Try selecting and deselecting the brush a few times. With the brush selected, hold down the CTRL key on your keyboard, drag the brush to a new position. The CTRL key is used when you want to move things around on the screen. Move the red brush so that it is not overlapping the original room at all. You will see the outline of the original room in a light brown. Go ahead and create the new room by pressing the subtract button again.
Creating a new room is that easy. The top left window is looking down on the level. The other two windows look at the front of the level and the side of it. If you want to move a room up or down, you can do it in these windows. Now, lets make two rooms joined together. Again holding the CTRL key down, drag the brush so it is overlapping the first room you already have and click on the subtract button again. Move around in the 3D preview window so that you can see the rooms. You have just created two rooms joined together. This is the way hallways are created. Connect rooms with longer, narrower rooms which become your halls. Go ahead and try out the level. Remember from Chapter 1 that you need to do 3 things before you test the level: 1) Place a light. Right click on the map where you want a light and select Place Light Here. You may want to place more than one light. 2) Place a PlayerStart in the level. Select Classes under the Object/Texture Browser, then under Navigation click on PlayerStart. Right click the location you want to place the starting point in the level and select Place NavigationPoint here. 3) Rebuild the geometry. Press F8 and click on rebuild geometry.
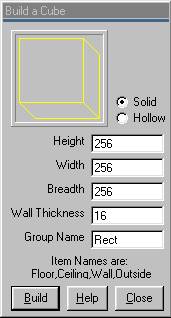
Resizing a brush To change the size of your brush, RIGHT click on the Tool Pallet on the brush shape you want to resize. The first item on the pop-up menu is for the properties of your brush. Go ahead and select it. You will notice many sizing options, depending on the shape of the brush you have selected. Don't worry about the wall thickness or inner radius settings as all the brushes we need will be solid for now.
If you right click on the cylinder or cone tool, you will notice an entry for SIDES. By increasing this value, you will make the room look more round. Remember, to many sides will slow down the level. It is surprising how round a room may appear with very few sides.
Basic Texturing One of the biggest contributors to how nice a level looks is the textures and WoT comes with some gorgeous ones. Currently, you level is all one texture. Time to change that. In the 3D Preview windows, left click on the floor. You should see the entire surface highlight. Choose a new texture for it by going to the Object/Texture selector and select textures in the Browse box. Find a good texture for your floor and click on it. The floor in the 3D preview will instantly change to the texture you select. Try a few until you find one you like, then change the wall textures.
Exercise Time for you to try it on your own. Starting from scratch, make a simple level consisting of 4 large rooms (a cube, a cylinder, a cone and a spherical room) connected by narrower cubic hallways. It should be in a square shape so that you can go in a complete circle passing through all the rooms.
Next In the next chapter, we will start building an actual room. So far, we have only talked about subtracting rooms. We will start adding brushes to a room to create columns and start placing objects to be picked up. Chapter 1:
A Quick Level
If you have questions or comments about this tutorial, please address them to Editing@wheelgame.com.
|
|
This site is not made by, and is in no way sponsored by, Legend Entertainment or GT Interactive. |